Exact Screen-Space Reflections on a Budget
The Three.js SSR examples miss up to half of the reflections they should find, and a denoiser paints over the gaps. This is the plan to replace approximate SSR with exact tracing: a Hi-Z depth pyramid, one output of radiance and coverage, half-resolution tracing with a joint bilateral upsample, and ray reuse as Frostbite does it.
Ben Houston • • 12 min read
How Games Do Screen-Space Reflections, and What Three.js Does Instead starts from one fact: screen-space reflections (SSR) in Three.js are approximate. This post is about replacing them with reflections that are exact, and cheap enough to leave on.
That post sets out the recipe shipped engines use, in nine steps, and finds Three.js differs at seven. This one covers the tracer: where the ray reads its color, how it finds a hit, at what resolution, and what it outputs.
Exact has a narrow meaning here. A screen-space ray can only see what is on screen, in one layer of depth. Within that limit, an exact tracer finds every hit the depth buffer contains and reports every miss as a miss.
Approximate SSR#
SSRNode marches each ray in a fixed budget of steps. A hit counts only when a step lands within a thickness tolerance of a surface. When the steps are longer than the tolerance, the ray passes through surfaces without noticing.
This is the oldest form of SSR. The reference SSRNode cites is a tutorial for beginners, and the march matches what Frostbite in 2015 called its cheap rays: a simple linear march that "may skip thin objects", kept for pixels rough enough to hide it. Frostbite traced everything smoother through a depth pyramid. Current implementations such as AMD's FidelityFX SSSR trace every ray that way, because it is the only way to afford rays that cross the whole screen.
Three settings decide how approximate the result is, and the examples set all three for speed:
| Setting | What it does | ssr_mirror | ssr_stochastic | ssr_animation |
|---|---|---|---|---|
maxDistance | How far a ray travels before it gives up | 1 | 0.4 | 20 |
quality | How many steps the ray takes | 0.5 | 0.25, which is 16 steps | 0.5, which is 32 steps |
binaryRefine | Accept any step that crosses behind a surface, then bisect to find where | Off | Off | Off |
Short rays. Two of the three examples do not trace the scene. They trace a small neighbourhood around each pixel and leave everything further away to the environment map. A floor reflects the object standing on it and not the wall behind it.
Few steps. Sixteen steps along a ray is a sample every several pixels at best.
No refinement. A step that lands behind a surface, past the thickness tolerance, is thrown away.
Short rays hide the cost of the other two. With few steps, the only way to keep the steps small is to keep the ray short. This is what the three settings cost when they are raised:
| Example | Hits found, default settings | Linear march raised to full quality |
|---|---|---|
ssr_mirror | 98% | 27.6 ms |
ssr_stochastic | 82% | 13.7 ms |
ssr_animation | 46% | 8.1 ms |
Trace time at 1920×1080. Hits are measured against a reference that takes one step per pixel.
With the settings the examples ship, the trace takes around 2 to 3 ms on a modern device. That is the number to remember: 2 to 3 ms for a trace that is approximate and local.
The hit rate only counts hits within each example's own maxDistance, so it flatters the two with short rays. The mirror example scores 98% of a search that stops one unit away. The animation example is the only one that traces across the room, and it loses more than half its hits.
This also makes approximate SSR hard to compare with anything better. An exact tracer run on the same scene reflects more of it, further away, and takes longer, and the two images differ for three reasons at once. A fair comparison raises the fixed-step march to the same distance and the same hit rate first. That is the right-hand column.
Approximate SSR is a reasonable trade when the result is a decoration added over the image. It stops working once reflections are resolved by coverage, because every false miss shows the environment map through the middle of a reflection.
The target#
A modern game engine expects three things of its SSR trace at once:
- Exact. Every hit the depth buffer contains is found.
- Full screen. A ray can cross the whole screen. Distance is not a setting to economize on.
- Under 1 ms.
That is what this work aims for. Today Three.js spends 2 to 3 ms and gets none of the three.
The output has a requirement too: it is coverage aware. One output, reflected radiance and how much of it is real.
Under a millisecond is not ambitious. Frostbite's stochastic SSR ran in 2.19 ms on a PlayStation 4 at 1600×900 with every pixel reflective, in 2015, and its two trace passes together took 0.57 ms of that:
| Pass | Time |
|---|---|
| Tile classification and ray allocation | 0.40 ms |
| Linear trace | 0.20 ms |
| Hi-Z trace | 0.37 ms |
| Resolve | 0.81 ms |
| Temporal filter | 0.30 ms |
| Total, as reported | 2.19 ms |
The rest of this post is that recipe, adapted to Three.js.
Before the trace: accurate normals#
An exact tracer is only as good as the direction it is given. The SSR examples store their normals as RGB8, eight bits per axis. On a smooth curved surface the stored normals snap to a limited set of directions, and so do the reflected rays. The result is banding in the reflection that no amount of tracing fixes, and noise that the denoiser then has to hide.
Games store two components with octahedral encoding. In the same four bytes per pixel, a half-float octahedral normal has a mean error of 0.011°, against 0.17° for RGB8. I have a pull request that adds packNormalToOctahedral() and unpackOctahedralToNormal() to Three.js and uses them in all three SSR examples. Building the AAA Lighting Pipeline in Three.js has the comparison images.
Short rays hide this too. An error of a fraction of a degree moves the end of a short ray by less than a pixel. Across a whole room it moves it by several.
Step 1: trace the depth pyramid#
A fixed-step march wastes most of its steps in empty space and still steps over thin things. Hierarchical depth tracing, known as Hi-Z, fixes both. It comes from Yasin Uludag's "Hi-Z Screen-Space Cone-Traced Reflections" in GPU Pro 5 (2014), and it is what Frostbite and AMD's FidelityFX SSSR trace with.
Build a mip chain of the depth buffer in which each texel holds the nearest depth of the four below it. A ray tests a coarse texel first. If it passes in front of the nearest depth in that whole region, nothing there can be hit, and the ray crosses it in one step. Otherwise it drops a level and looks closer.
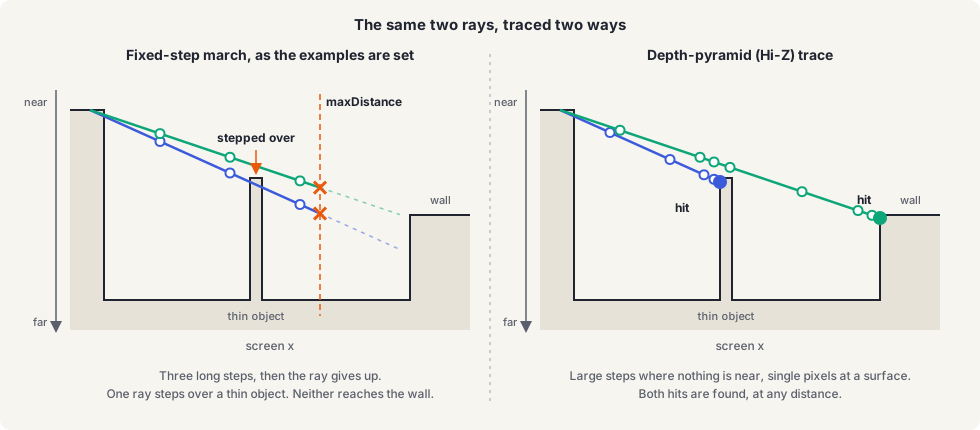
The same two rays. The march steps over one hit and gives up before the other. The pyramid trace finds both.
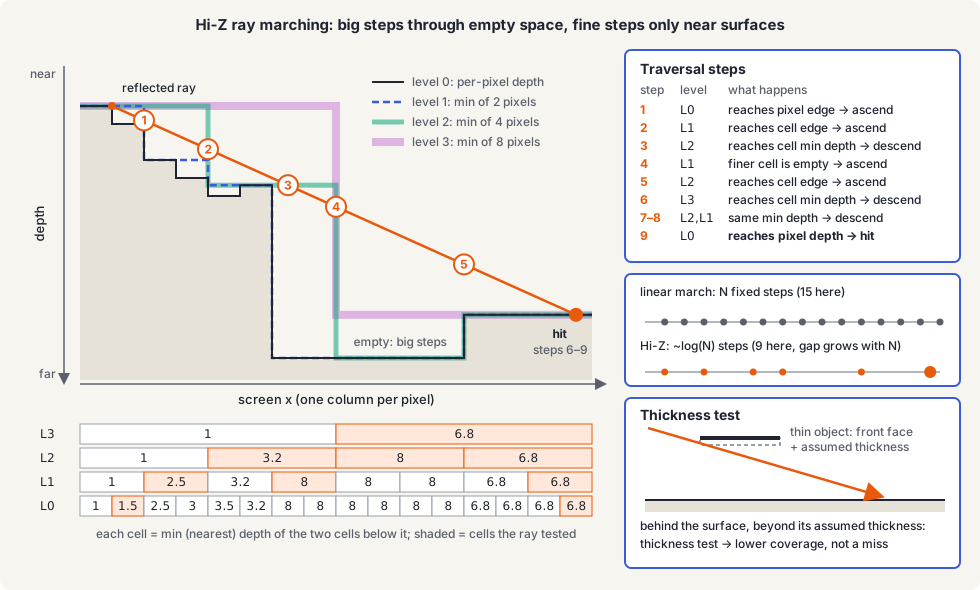
Coarse levels cross empty space. Fine levels find the surface.
The ray takes large steps where nothing is near and single-pixel steps where something is, so it finds the same hits as a march of one step per pixel. The implementation adds a HiZNode that builds the pyramid in a compute pass and a tracing: 'adaptive' option on SSRNode:
| Example | Linear march at full quality | Hi-Z |
|---|---|---|
ssr_mirror | 27.6 ms | 2.9 ms |
ssr_stochastic | 13.7 ms | 9.2 ms |
ssr_animation | 8.1 ms | 5.2 ms |
Trace time at 1920×1080 and full resolution, pyramid construction included.
That is exact tracing of the whole screen for a fraction of what the linear march needs to match it. A ray that crosses the screen through empty space takes a handful of coarse steps.
It is not yet under a millisecond, and the reason is simple: these numbers trace a ray for every pixel. The follow-up pull request makes the Hi-Z trace faster again, and is the one to read for current results. It also traces at full resolution. Half-resolution tracing is a separate change, in step 4, and a quarter of the rays is what brings an exact, full-screen trace into the budget.
Step 2: one output#
SSRNode today returns a color with a BRDF estimate already applied, a hit distance in alpha, and on a miss a sample of its own environment map. The exact tracer returns one thing:
- RGB: the radiance the ray found, premultiplied by coverage.
- Alpha: coverage. 1 for a hit, 0 for a miss, fading toward the screen border.
Hit distance moves to a second attachment, where the denoiser reads it.
Everything else leaves the node: the environment input, its importance sampler, the intensity controls, the metalness and Fresnel estimates. The environment belongs to the material, which falls back to it wherever coverage is below 1. The BRDF belongs to the material too. Pluggable Indirect Lighting for Three.js describes how the output gets there.
This removes more code than it adds, and it removes the two ways to get SSR wrong: counting the environment twice, and shading the reflection with a different BRDF from the surface it is on.
Step 3: trace last frame#
This step is not an optimization. Without it the rest cannot be used correctly.
A reflection has to be computed before the material that uses it is shaded, and the tracer needs a shaded image to reflect. Three.js traces the current frame, so the reflection only exists after shading is finished, and the only thing left to do with it is add it on top. Rendering the scene twice gets around that and costs a full scene pass.
Every engine in the recipe traces the previous frame's image instead. I have a pull request that adds this to Three.js as an option. Each hit is reprojected with its motion vector and checked against last frame's depth. A hit that fails the check has zero coverage, and the next source in the cascade answers. Because last frame's image already contains reflections, repeated bounces build up over a few frames for free.
Step 4: half resolution#
Reflections on anything but a mirror are blurry. They do not need a ray for every pixel.
Tracing at half resolution in each direction is a quarter of the rays, and a quarter of the trace time. The difficulty is getting back to full resolution. Plain bilinear upsampling smears a reflection across the edge of the object it is on.
A joint bilateral upsample solves it. The filter is from Kopf and others in 2007 and is the standard way to bring a low-resolution effect back to full resolution. Each full-resolution pixel takes its four nearest half-resolution samples and weights them by how well their depth and normal match its own. Samples from a different surface get no weight. On half-resolution ambient occlusion the same filter costs about 1 ms at 1080p and removes the dark outlines that bilinear upsampling leaves.
Coverage is upsampled with the same weights as radiance. It is one more channel.
Step 5: reuse rays#
One ray per half-resolution pixel is a noisy estimate. Frostbite's answer is the largest single quality gain in its recipe: every pixel also uses the rays its neighbours traced.
A neighbour's ray went in a slightly different direction and hit somewhere slightly different. For the pixel being resolved that is still a sample of its own reflection lobe, at a different probability. So each borrowed ray is weighted by this pixel's BRDF in that direction, divided by the probability with which the neighbour chose it:
result = 0, weightSum = 0;

for ( const pixel of neighbourhood ) {

	const weight = localBrdf( pixel.hit ) / pixel.hitPdf;

	result += color( pixel.hit ) * weight;
	weightSum += weight;

}

result /= weightSum;
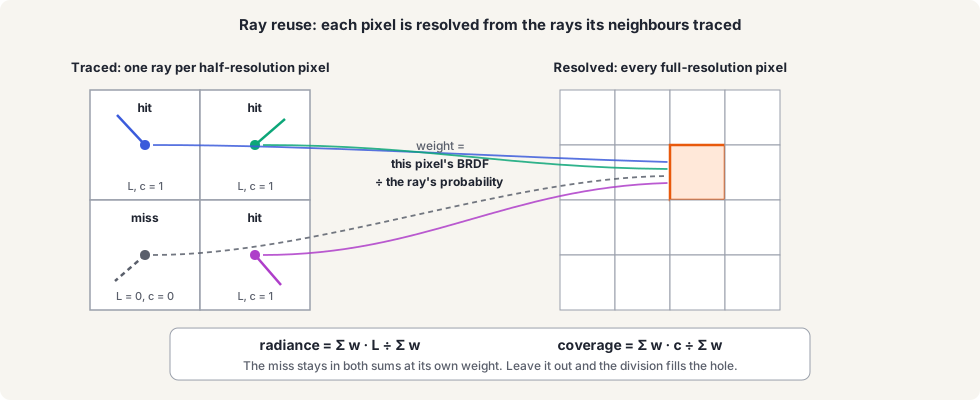
One full-resolution pixel resolved from four neighbouring rays, one of them a miss.
Four neighbours give four samples per pixel for the price of one ray. Because each pixel weights the shared rays with its own normal and roughness, the resolve can run at full resolution over a half-resolution trace and keep per-pixel detail. In Three.js it can be the same pass as the upsample.
There is one rule to keep. A neighbour's miss is a sample too. It enters the sum with zero radiance and zero coverage, at its own weight. Dropping misses from the sum would be hole filling under another name, which How Games Denoise Reflections, and What Three.js Does Instead covers.
With four effective samples per pixel going in, the temporal and spatial denoisers have far less to do, and can use shorter histories and smaller kernels.
Step 6: read the right mip#
A rough surface spreads its rays over a wide lobe. Each ray stands for a cone of directions, and at the hit that cone covers a disc of pixels. Reading one sharp pixel there throws that information away.
Frostbite reads the color buffer at the mip level that matches the disc, which grows with roughness and with distance to the hit. Nothing is traced as a cone; it is one lookup at a chosen mip. The implementation adds this to SSRNode and uses the same footprint to let rough rays stop at a coarser level of the depth pyramid.
Frostbite also uses the split the other way. Pixels rough enough to be blurred heavily get a cheap linear march that, in its words, "may skip thin objects", and only smooth pixels pay for the exact trace. Three.js has the same option as approximateSteps. It belongs behind a roughness threshold, not on by default.
This step matters least. It smooths color noise, and most of the noise in a reflection is whether a ray hit at all, which ray reuse addresses and a color filter does not.
The order#
Each step is a pull request that stands alone.
- A hit-rate view in the SSR examples, so the starting point is on record.
- Octahedral normals in the examples.
HiZNodeand exact tracing, as an option.- Radiance and coverage as the output, with the environment and BRDF removed from
SSRNode. - Previous-frame tracing.
- Half resolution with the joint bilateral upsample.
- Ray reuse in the resolve.
- Mip selection from the cone footprint.
- Exact tracing as the default, and the fixed-step march as the option.
Steps 2 to 6 are written and linked above. Ray reuse is the piece still to build. Half resolution is what brings the trace under a millisecond, and ray reuse is what keeps the result clean at that resolution.