How Games Do Screen-Space Reflections, and What Three.js Does Instead
Shipped engines agree on how to do screen-space reflections: trace last frame's image through a depth pyramid at half resolution, reuse rays between pixels, denoise the light, blend it with the other reflection sources by coverage, and apply the BRDF once to the result. Three.js differs at seven of nine steps. This is the recipe, the comparison, and the plan to close the gap.
Ben Houston • • 16 min read
Three.js has screen-space reflections (SSR). It has an environment map, lightmaps, a light probe grid, and reflection probes in review. What it does not have is a correct way to use them together, and SSR is where that shows most.
This post does three things. It sets out how shipped engines do SSR, step by step, with the sources. It measures Three.js against that recipe. And it explains why the differences cannot be fixed one at a time, which is why three follow-up posts fix them together.
The recipe#
There is a standard way to do screen-space reflections. Its fullest description is Tomasz Stachowiak and Yasin Uludag's Stochastic Screen-Space Reflections from Frostbite, presented at SIGGRAPH 2015. AMD's FidelityFX SSSR, Unity's HDRP and Unreal's Lumen follow the same shape. It has nine steps, and one requirement on its input.
The input: accurate normals. Every ray starts from the normal stored in the G-buffer, and a small error there becomes a large one at the end of a long ray. Games store normals with octahedral encoding, which folds the sphere of directions into a square and keeps two components at 16 bits each. It is the most accurate encoding for its size in Cigolle and others' survey. An RGB8 normal is wrong by 0.17° on average. An octahedral one, in the same four bytes, is fifteen times closer.
1. Reflect last frame's image. The reflection has to exist before the surface that shows it is shaded, so the tracer reads the finished image of the previous frame, reprojected to the current one. Frostbite lists it as the baseline every SSR shares: return the color at the hit point, taken from the "final lighting of last frame", reprojected. HDRP "reads a color buffer with a blurred mipmap generated during the previous frame".
2. Sample the BRDF. Each pixel traces one ray, in a direction drawn from its own specular lobe: a mirror sends every ray the same way, a rough surface spreads them. Frostbite samples the GGX distribution, biased toward the mirror direction to cut noise from the lobe's tail. The refinement most engines now use is sampling only the normals visible to the viewer, from Heitz and d'Eon.
3. Trace through a depth pyramid. A mip chain of the depth buffer, where each texel holds the nearest depth beneath it, lets a ray cross empty space in large steps and find the exact pixel it hits. This is Hi-Z tracing, from Uludag's "Hi-Z Screen-Space Cone-Traced Reflections" in GPU Pro 5 (2014). Frostbite's course notes give the reason: it "allows us to trace quickly long rays, and use as much as possible of the available scene information". FidelityFX SSSR is built on the same traversal.
The alternative is a linear march. Done well it steps one pixel at a time, as in McGuire and Mara's Efficient GPU Screen-Space Ray Tracing. Frostbite keeps a cheap linear march for its rough pixels, where a wide blur hides a missed hit, and labels it plainly: "may skip thin objects". Smooth pixels get the exact tracer.
4. Trace at reduced resolution. Frostbite traces one ray per half-resolution pixel. That is a quarter of the rays.
5. Reuse rays between pixels. Each full-resolution pixel is resolved from the rays its neighbours traced, each weighted by this pixel's BRDF and divided by the probability with which it was generated, then normalized. Four neighbours give four samples for the price of a quarter of a ray. Because the weights use the pixel's own normal and roughness, the result keeps full-resolution detail.
6. Read a prefiltered color. A ray on a rough surface stands for a cone of directions. At the hit, the color is read from a mip level that matches the cone's footprint, which grows with roughness and distance. Frostbite calls this filtered importance sampling: "no actual cone tracing".
7. Filter over time. The resolved reflection is blended with its own history. The history is reprojected using the depth of the reflection, not the depth of the surface, so that reflections move with correct parallax, and clamped to the range of its neighbourhood as in temporal anti-aliasing. General-purpose denoisers such as SVGF and NVIDIA's NRD add a spatial filter that stops at edges in depth and normal.
8. Blend with the other reflection sources by coverage. SSR does not finish the pixel. It returns light and a coverage: how much of the pixel it could answer, from 0 to 1. The lighting code fills the rest from the next source, local reflection probes and then the distant environment, each taking what the ones before it left. This is the coverage cascade from How AAA Games Light Indoor Scenes, with SSR as its first stage. Frostbite's course notes give it as pseudocode:
// Short range reflections
Evaluate SSR
RGB = SSR.rgb
Alpha = SSR.a

// Medium range reflections
While local light probes And Alpha < 1 do
   Evaluate local light probe
   a = saturate(localLightProbe.a - Alpha)
   RGB += localLightProbe.rgb * a
   Alpha = saturate(a + Alpha)

// Large range reflections
If Alpha < 1 Then
   Evaluate distant light probe
   RGB += distantLightProbe.rgb * (1-Alpha)
HDRP calls the same thing a reflection hierarchy: "Screen space reflection controls its own weight", "sky reflection has a fixed weight of 1", and it "evaluates all lighting techniques until it reaches an overall weight of 1". Some engines fill earlier. Lumen makes the same decision per ray: it traces the screen first, "before using a more reliable method if no hit is found". AMD's tracer blends the environment map into each ray that missed. Both give the denoiser a finished signal, where the engines above give it light and coverage. How Games Denoise Reflections, and What Three.js Does Instead compares the two, and says why this series fills after the denoiser.
9. Apply the BRDF once, to the blended result. Everything up to this point is incoming light: what the rays found, what the denoiser filtered, and what the cascade blended. The material multiplies that one result by its BRDF, whichever source the light came from. Frostbite multiplies by the BRDF's pre-integrated term "after temporal", when the reflection is applied, and notes that it "reduces smearing and noise". NRD states it as a rule: "all materials must be de-modulated before denoising".
Filament does steps 8 and 9 in one line of its lighting shader. E is the BRDF term, and Fr arrives holding the probe and environment reflection, already multiplied by E:
Fr = Fr * (1.0 - ssrFr.a) + (E * ssrFr.rgb);
That is E times the coverage blend of SSR and its fallback.
The cost. Frostbite reported 2.19 ms for all of this on a PlayStation 4 at 1600×900, with every pixel reflective. The trace itself took 0.57 ms. That is the expectation in a modern engine: the SSR trace is exact, covers the full screen, and costs less than a millisecond.
Three.js against the recipe#
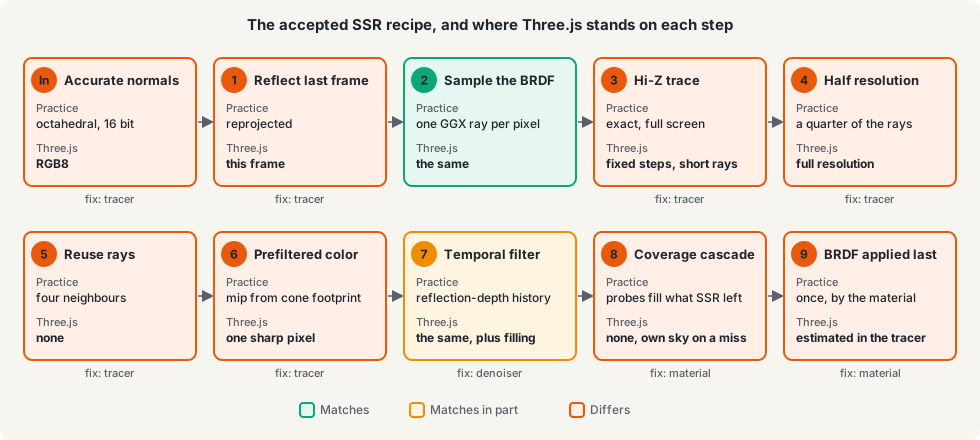
The recipe at a glance. Green matches, amber matches in part, orange differs. Each box names the post that fixes it.
| Step | Accepted practice | Three.js today |
|---|---|---|
| Input normals | Octahedral, 16 bits per component | RGB8 in the examples. Octahedral packing is in review |
| 1. Source image | Last frame, reprojected | This frame, so the reflection can only be added after shading. Tracing the previous frame is in review as an option |
| 2. Sampling | One ray from the GGX lobe | The same, in stochastic mode |
| 3. Tracing | Depth pyramid, exact, across the screen | Fixed-step march, short rays, no refinement |
| 4. Resolution | Half | Full in every example. There is a resolution setting and no depth-aware upsample to go with it |
| 5. Ray reuse | Four neighbours, weighted by BRDF | None |
| 6. Prefiltered color | Mip chosen from the cone footprint | One unfiltered pixel |
| 7. Temporal filter | Reflection-depth reprojection, clamped history | The same reprojection. The clamp is taken against single rays, outliers are hidden by darkening, and misses are filled from neighbours |
| 8. Coverage cascade | SSR returns light and coverage. Reflection probes and the environment fill what it left | No coverage. The tracer fills misses from its own copy of the environment map, so no other source can take part |
| 9. BRDF | Applied once by the material, to the blended result, after denoising | Estimated from the G-buffer inside the tracer, before denoising. The result is added to the finished image |
Step 2 matches, and step 7 matches in its reprojection only. The input and the other seven steps do not.
Step 3 deserves detail, because it is where the rest starts. SSRNode marches each ray in a fixed number of steps and accepts a hit only when a step lands within a thickness tolerance of a surface. The examples keep that affordable with three settings:
- Short rays.
maxDistanceis 1 in one example and 0.4 in another. Those rays do not cross the scene. They search a small neighbourhood and give up. - Few steps.
qualityis set to 16 or 32 steps per ray. - No refinement.
binaryRefine, which catches a step that lands behind a surface, is off.
Measured against a reference that takes one step per pixel, the three examples find 98%, 82% and 46% of the hits within their own ray length. The one that scores 46% is the only one that traces across the room.
This is a dated design. The march is the kind found in introductory SSR tutorials, one of which SSRNode cites as its reference, and it matches the cheap tier of Frostbite's 2015 tracer. Frostbite accepted those rays only where a wide blur hides them. Three.js uses them everywhere, mirrors included, and keeps them short to stay fast. Engines moved to depth-pyramid tracing because it makes rays that cross the whole screen affordable, and a reflection that stops a short distance from the surface is not much of a reflection.
I will call what Three.js has approximate SSR. With the settings the examples ship, its trace takes around 2 to 3 ms on a modern device. So Three.js pays two to three times the budget for a trace that is neither exact nor full screen.
A miss is not always an error, so it helps to separate two kinds.
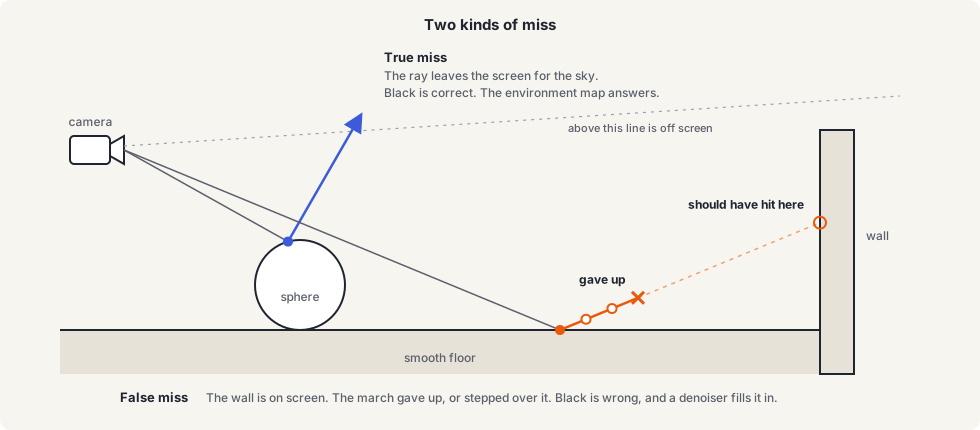
A true miss leaves the screen, and black is the right answer. A false miss had something on screen to hit.
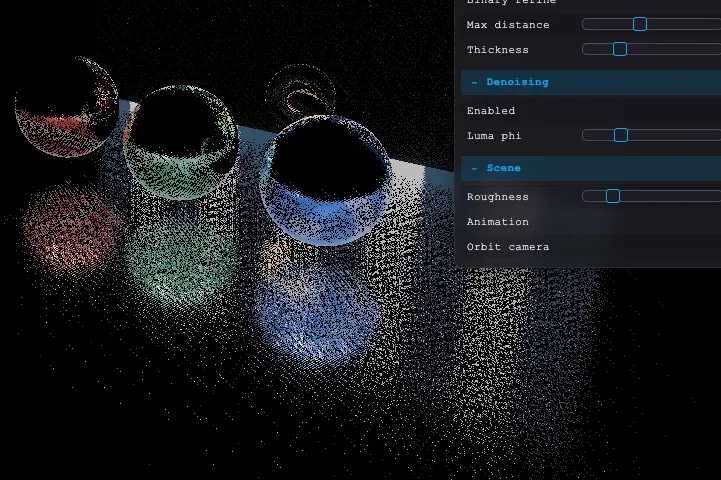
One frame of raw SSR from the animation example. The black gaps between pixels on the smooth floor are rays that should have hit the wall in a modern SSR approach.
Why the differences hold each other in place#
The rows of that table are not independent. Each one exists because of the one before it.
The tracer misses, so the denoiser fills. The two denoising nodes treat every black pixel as missing data and paint over it with whatever the neighbouring rays found. That is why approximate SSR looks acceptable.
The denoiser fills, so there is no coverage. A ray that leaves the screen has a correct answer: "ask something else". That needs a coverage value beside the color. SSRNode has none: alpha holds the hit distance, and a miss is written as black. A filter that fills black cannot tell a miss from a hole or from a reflection of something dark.
There is no coverage, so SSR samples the environment itself. With no way to hand a miss to the material, SSRNode grew its own environment input. It takes a second copy of the environment as an equirectangular HDR image, cannot use scene.environment, has its own intensity setting, and pushes the sky through the reflection denoiser. Sampling the environment in the tracer is not wrong in itself, and AMD's tracer does it. The problem is that it is a second environment, and the only fallback there can be.
SSR answers every pixel, so it is added on top. The reflection never reaches the material. Two examples add it to the finished image, where the material has already reflected the environment, so every hit is counted twice. The third patches PhysicalLightingModel.prototype to switch the environment's reflection off for every material on the page. In all three the material's own Fresnel, specular color, clearcoat and anisotropy are replaced by an estimate rebuilt from the G-buffer.
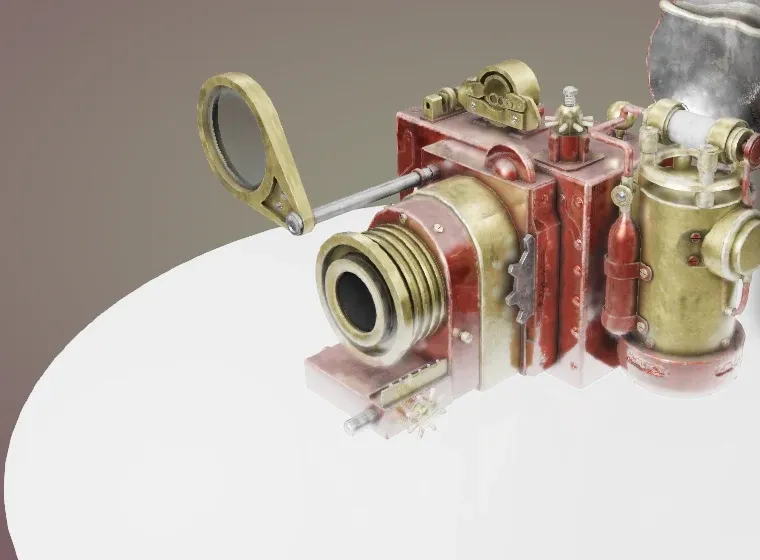
webgpu_postprocessing_ssr_mirror today. The metal washes out because it reflects the environment and the screen at once.
Now try to fix one row. Stop the denoiser filling misses, and the reflections go dim and speckled, because the tracer's misses show. Give SSR coverage, and nothing can read it, because the material has no input for it. Remove the environment from SSRNode, and misses go black. Turn on exact tracing over the whole screen, and the frame rate drops. Every individual change is correct and looks like a regression.
It is also why a better tracer is hard to evaluate. An exact one sees further, finds more and costs more, all at once, and the image it is compared with was tuned around the approximate one.
The same problem in every other source#
Step 8 is not only about SSR. In the recipe, every reflection source is one entry in one list. In Three.js every indirect light source enters a material by its own route, with its own rule for combining with the others.
| Source | How it reaches the material | How it combines |
|---|---|---|
| Environment map | EnvironmentNode, from scene.environment | The base that everything else is added to |
| Lightmap | material.lightMap | Added |
| Light probe grid | A light in the scene graph | Added. Where grids overlap, the one with the highest priority wins |
| SSGI, voxel GI | builtinGIContext | Added |
| Reflection probes (in review) | A new provider chain inside EnvironmentNode | Replaces the environment by coverage |
| SSR | A post-process | Added to the finished image |
Almost everything is added. That is right for one source and wrong for two. A room lit by a baked probe grid and an environment map gets the sky's diffuse light in full, on top of a bake that already contains the sky. A lightmapped wall with SSGI on it counts its bounce light twice. Only the reflection probes replace what is behind them, and to do it they bring a second mechanism into core.
None of these was a mistake when it was written. Each was the simplest way to add one source. The cost shows when an application wants three of them at once, which is what an interior scene needs.
What it costs#
- Wrong results in complex lighting. A scene with a single environment map renders correctly. Add probes, a lightmap and SSR and the energy no longer adds up, in ways that depend on which sources overlap at each pixel.
- Several ways to do each thing. There are three SSR examples and three different compositions. There are two proposed ways to feed a reflection into a material. An application author cannot tell which is the intended one.
- Complexity in the wrong places.
SSRNodecontains an environment sampler and a BRDF approximation. The denoisers contain special cases for environment rays. The reflection probes change seven files in the lighting core. - Tuning by eye. Intensity sliders on SSR, a hand-set environment intensity of 3.14 in one example, filter radii that change how bright a reflection is. These are knobs for hiding an imbalance.
- Changes that are hard to review. A correct fix to one row makes an example look worse, so it is hard to land alone.
Three fixes#
Closing the gap takes three changes. Each has its own post, and each maps to rows of the table.
The tracer: the input, and steps 1 and 3 to 6. Store normals accurately. Replace the fixed-step march with Hi-Z tracing, which finds every hit and lets a ray cross the whole screen for little more than a short one. Pay for it the way Frostbite does: half resolution, ray reuse, prefiltered color. The aim is a trace that is exact, full screen and under 1 ms. Trace last frame. Output radiance and coverage and nothing else. Exact Screen-Space Reflections on a Budget covers this.
The denoiser: step 7. A miss is an answer, not a gap. Its zero coverage is carried through the filter, and what it did not cover is left for the next source instead of being painted in from its neighbours. What is filtered is light, before any BRDF. Three.js has two denoisers, and the newer one is the one to build on. How Games Denoise Reflections, and What Three.js Does Instead covers this.
The material: steps 8 and 9. One hook lets an application replace where a material's indirect light comes from. A coverage cascade built on it, as an addon, takes SSR, reflection probes, the probe grid, the lightmap and the environment as ordered lists, and the material applies its BRDF once. Pluggable Indirect Lighting for Three.js covers this.
That last post also settles a question the cascade raises inside the lighting model. Three.js gives a material three kinds of indirect light where Filament and Frostbite give it two, and the third has no place in a cascade.
The order#
The work is ordered so that no step lands as a regression.
- Make the gap visible. A hit-rate view in the SSR examples, so approximate tracing can be seen on
devbefore anything changes. - Exact tracing, as an option. Independent of everything else.
- The hook in core.
- Radiance and coverage from SSR, carried through the denoisers and resolved in the material. This is the step that removes the double counting.
- Speed: half resolution with a depth-aware upsample, then ray reuse.
- The probes, as sources in the same cascade.
- Two lighting quantities in place of three.
- An interior example that uses all of it.
Steps 2 to 4 are prototyped. The rest of this series is about getting them into Three.js.